User guide

COISoftware user guide, every feature explained

This guide covers every part of COISoftware that you use day to day. Watch the video for a full walk through, then use the sections below when you want the exact buttons and menus for one task.

About 7 minutes with narration and English captions. Jump to a chapter:

Step 1

Create your account

Available in All plans, including the one time demo

Your workspace starts with a free signup. Every new account gets a one time demo of 10 certificates, so you can read real documents and try every screen before you choose a plan.
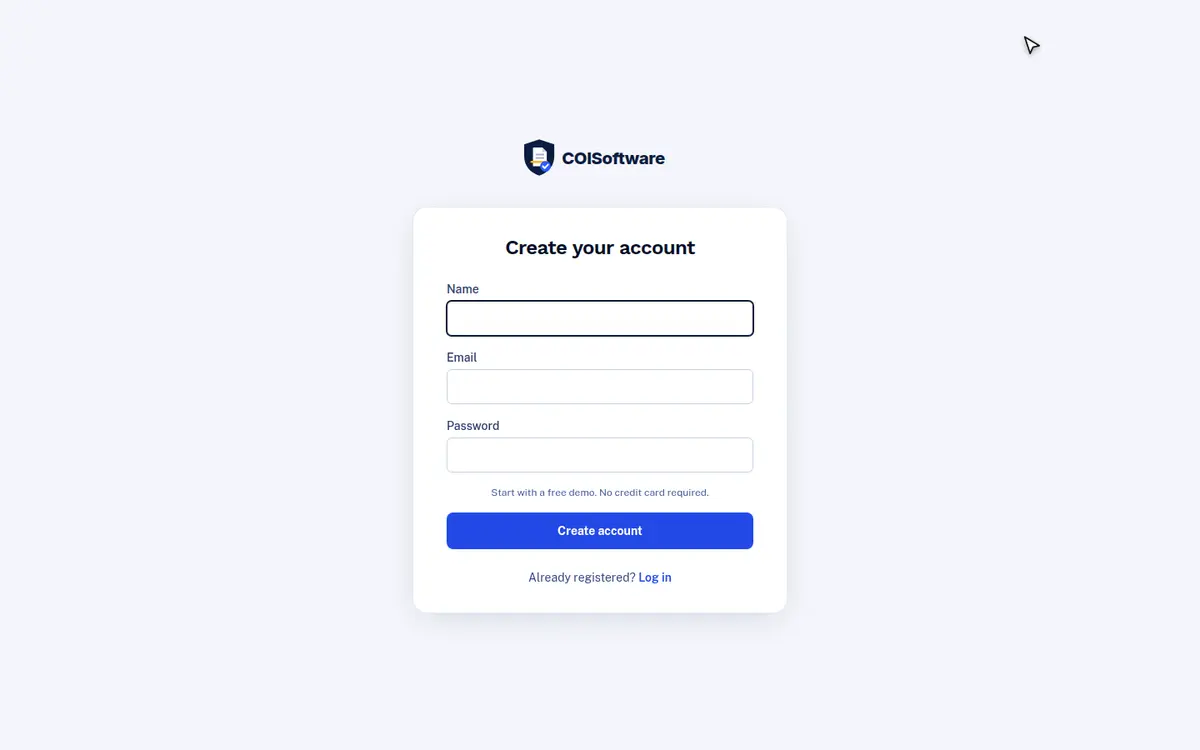
COISoftware create account form with name, email and password fields

How to do it

  1. On the home page choose Get started, or open the Create your account page.
  2. Enter your name, your work email and a password, then click Create account.
  3. Open your inbox and copy the four digit code from the email. If you do not see it, look in the Spam folder.
  4. Type the code on the Email Verification code screen and click Verify. You land on the Certificates page.

Good to know. Use an address on your company domain. Reminders and notices about your certificates are sent there.

Step 2

Upload certificates

Available in All plans. The demo reads the first 5 files of each batch

The Certificates page is where every certificate enters your account. One upload counts as one certificate, whatever its page count, and endorsement pages attached to it are included.
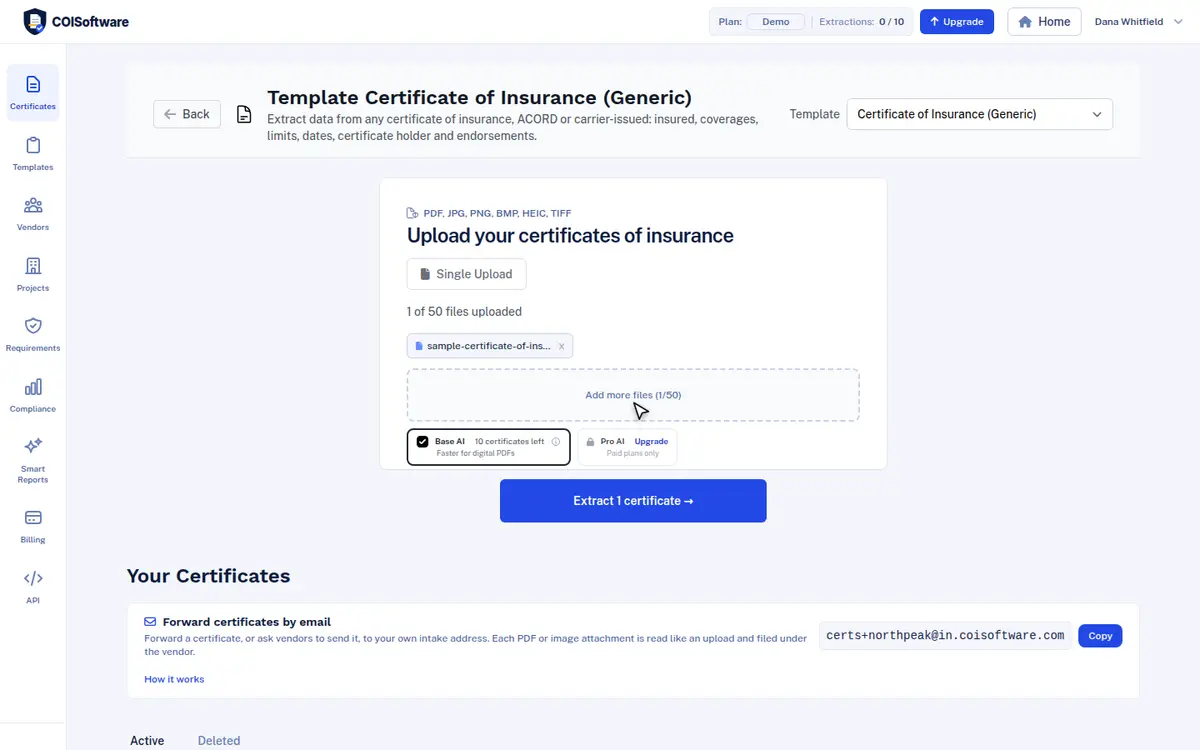
Certificates page with an uploaded certificate file and the Base AI option selected

How to do it

  1. Click Certificates in the left menu.
  2. Click the upload area, or drag files onto it. PDF, JPG, PNG, BMP, HEIC and TIFF files work, up to 50 files at a time.
  3. Choose the reading model. Base AI is the fast choice for clean digital PDFs. Pro AI is for scans and difficult documents and is part of the paid plans.
  4. Leave the template on Certificate of Insurance (Generic), or pick another one from the Template list at the top.
  5. Click Extract. When you upload several files the button shows how many, for example Extract 3 certificates.

Good to know. Scans and phone photos are read with visual OCR, so you do not need to retype anything.

Step 3

Read the result

Available in All plans

In seconds the certificate is read and filed. The result page shows the policy status, the expiration date, how many days remain before the first policy expires, and how the certificate measures up against a typical requirement set.
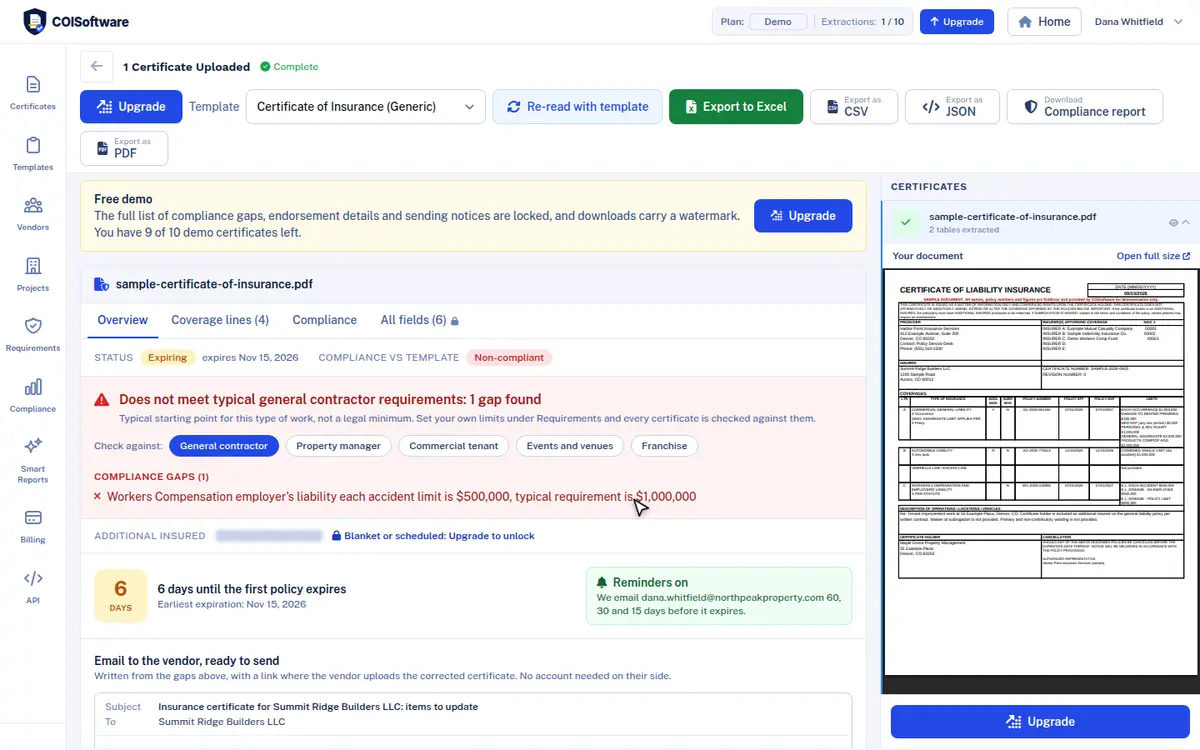
Result page showing policy status, expiration date and compliance gaps for one certificate

How to do it

  1. Wait for the status next to the title to change to Complete.
  2. Read the Status badge (for example Expiring) and the expiration date beside it.
  3. Read the compliance box. Each gap is written in plain language, for example a limit that is below the typical requirement.
  4. Under Check against, click another profile (General contractor, Property manager, Commercial tenant, Events and venues, Franchise) to see how the same certificate scores for that kind of work.
  5. Click the arrow at the top left to go back to your list of certificates.

Good to know. The profiles are typical starting points, not legal minimums. Your own limits live under Requirements.

Step 4

Coverage lines, Compliance and All fields

Available in Overview, Coverage lines and Compliance on all plans. All fields and additional insured wording on paid plans

The tabs above the result break one certificate into the parts you work with.
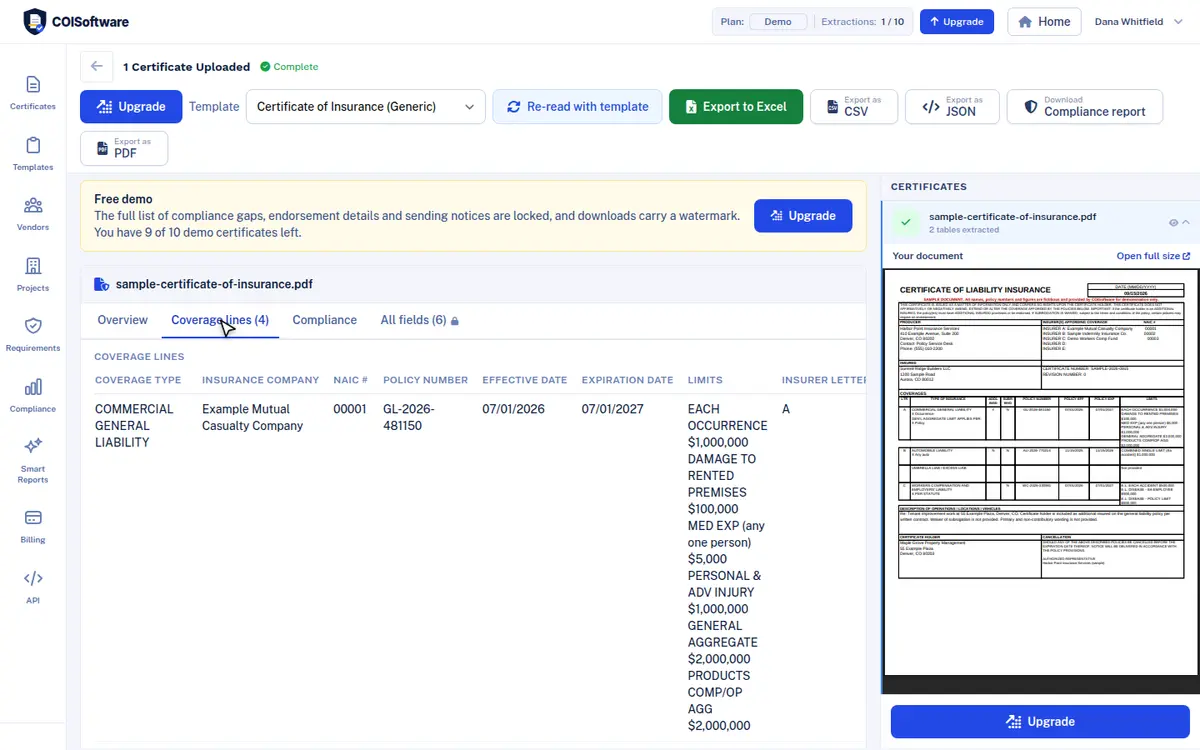
Coverage lines tab listing each policy with insurer, policy number, dates and limits

How to do it

  1. Overview shows the status, the gaps and the countdown to the first expiration.
  2. Coverage lines lists every policy with its type, insurer, policy number, effective and expiration dates and limits.
  3. Compliance walks through each requirement check and tells you which ones pass and which do not.
  4. All fields lists every value that was read from the document. It is unlocked on paid plans, together with the additional insured wording from the endorsement.

Good to know. Open a vendor and use Check and correct fields if a value needs to be fixed by hand.

Step 5

Renewal reminders and vendor emails

Available in Reminders on all plans. Sending the vendor email on paid plans

You do not have to remember renewals. Automatic reminders are on from the first upload, and an email to the vendor is drafted from the gaps found on the certificate.
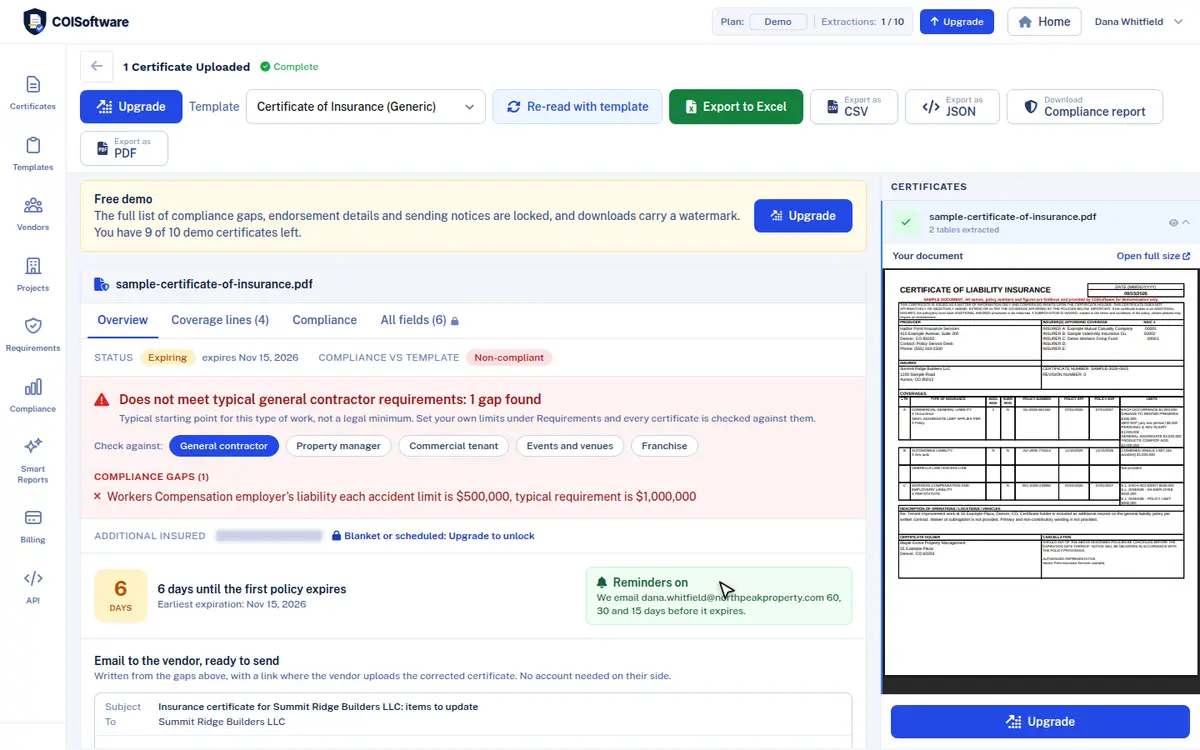
Result page with the reminders on box and the email to the vendor drafted from the gaps

How to do it

  1. Scroll the result to the Reminders on box. It names the address that receives the reminders and the schedule: 60, 30 and 15 days before the policy expires.
  2. Scroll to Email to the vendor, ready to send. The subject, the list of gaps and a link where the vendor uploads the corrected certificate are already written.
  3. On a paid plan, click Send to email it to the vendor. On the demo the button reads Upgrade to send.
  4. Open Email settings on the Vendors page to see how many emails a vendor can receive. The default is at most one email per vendor every 3 days.

Good to know. The vendor needs no account and pays nothing. The link in the email opens a simple upload page.

Step 6

Export your data

Available in All plans. Demo exports carry a watermark, paid plans export clean files

Every result can leave COISoftware as a file, so the data can go into your spreadsheets and reports.
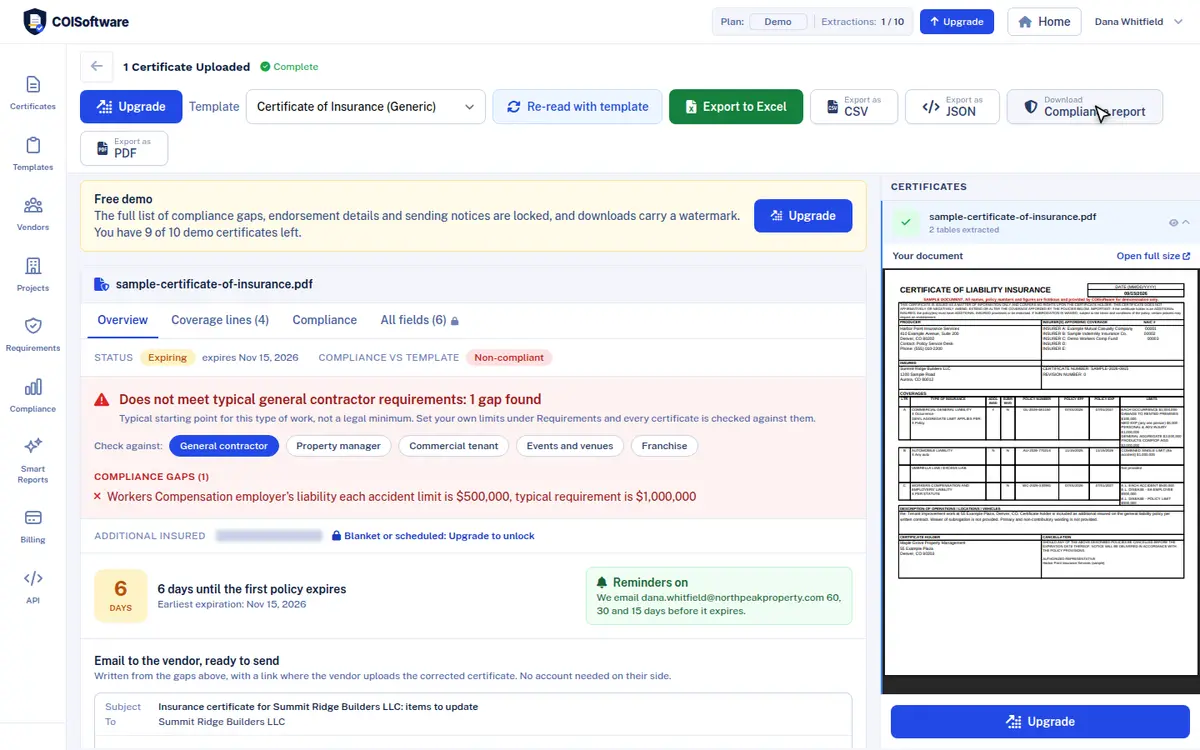
Export buttons at the top of the result page for Excel, CSV, JSON, PDF and the compliance report

How to do it

  1. On the result page, use the buttons at the top: Export to Excel, Export as CSV, Export as JSON and Export as PDF.
  2. Click Download Compliance report for a file that lists the insured, the certificate holder, the insurers, the coverages, the earliest expiration, the status and the gaps against your requirement set.
  3. On the Vendors page, use XLSX or CSV next to Export list to download your whole vendor list.
  4. On Coverage on a date and Groups, use Export CSV to download what is on screen.

Step 7

Set your insurance requirements

Available in All plans

Requirements are the limits and endorsements your vendors must carry. Every certificate is checked against your default requirement set automatically.
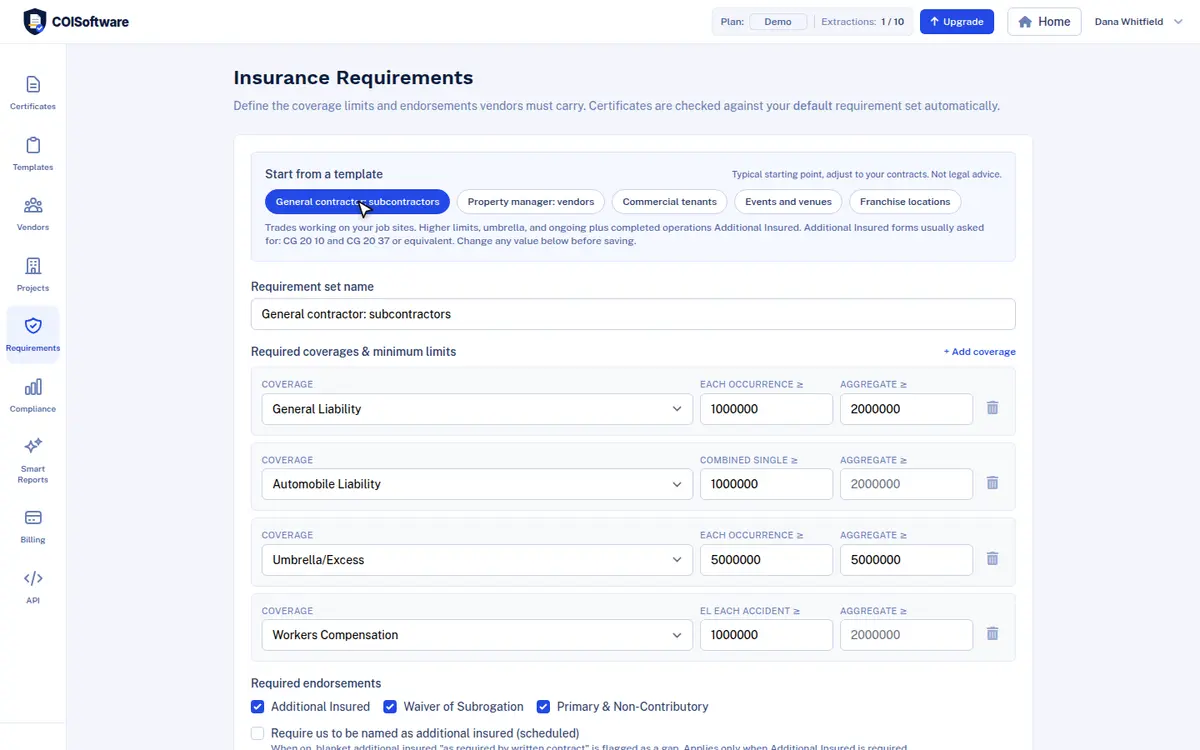
Requirements page with the General contractor template and editable coverage limits

How to do it

  1. Click Requirements in the left menu.
  2. Click New requirement set, or choose Use template on a ready made template such as General contractor, Property manager, Commercial tenants, Events and venues or Franchise locations.
  3. Change the name and any limit. Add a coverage with Add coverage, or remove one with the bin icon.
  4. Tick the endorsements you require: Additional Insured, Waiver of Subrogation and Primary and Non Contributory.
  5. Click Save. Your first set becomes the default. For later sets, click Set default to make a set the one that certificates are checked against.

Good to know. You can also give one project, one vendor type or one vendor its own set. The more specific set wins.

Step 8

Manage vendors

Available in All plans

The Vendors page lists every vendor, subcontractor and tenant with a status read from their certificates. Vendors appear automatically the first time one of their certificates is uploaded.
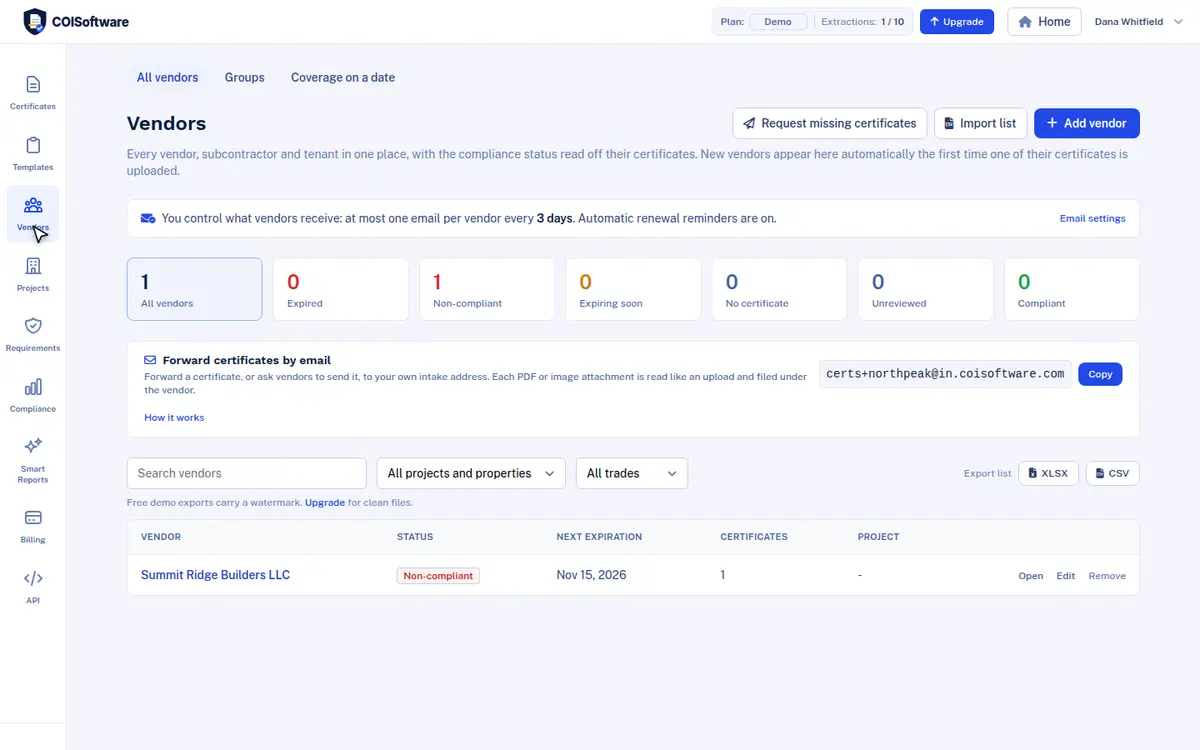
Vendors page with status cards, intake address and the vendor list

How to do it

  1. Click Vendors in the left menu.
  2. Click Add vendor. Enter the vendor name as it appears on the certificate, the vendor type or trade, a contact name, a contact email and the project or property, then click Save vendor.
  3. To load many vendors at once, click Import list and follow the instructions on screen.
  4. Click a card at the top, such as Expired, Non-compliant, Expiring soon, No certificate, Unreviewed or Compliant, to filter the list. You can also search by name and filter by project and trade.
  5. Click Edit to change a vendor or Remove to take it off the list.

Good to know. Use Request missing certificates to ask every vendor without a certificate in one go.

Step 9

Vendor page and audit trail

Available in All plans. Sending notices on paid plans

Each vendor has a page with its certificates, its next expiration and a full history.
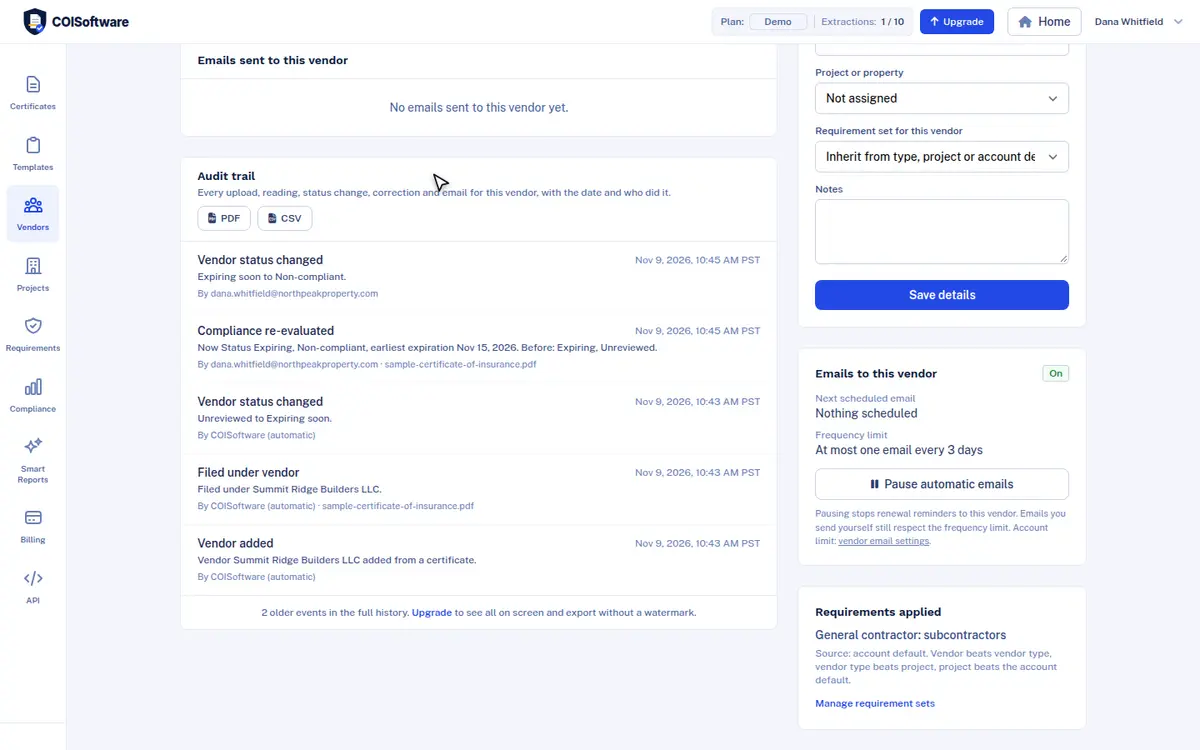
Vendor page with the audit trail listing uploads, readings and status changes

How to do it

  1. On the Vendors page, click the vendor name or Open.
  2. Read the status, the number of certificates on file and the next expiration at the top.
  3. In the certificate table, click Check and correct fields to fix a value that was read wrongly.
  4. Click Request certificate to ask for a missing document. The vendor gets a link to upload it with no account and no fee.
  5. Click Send deficiency notice to email the exact gaps to the vendor.
  6. Scroll to Audit trail to see every upload, reading, status change, correction and email with the date and who did it. Export it with PDF or CSV.

Good to know. For motor carriers, the Vehicles and drivers box lets you add each vehicle and driver. Each one is approved only while the carrier's auto liability is current.

Step 10

Email intake

Available in All plans

Every account has its own intake address. Anything sent to it is read like an upload and filed under the right vendor.
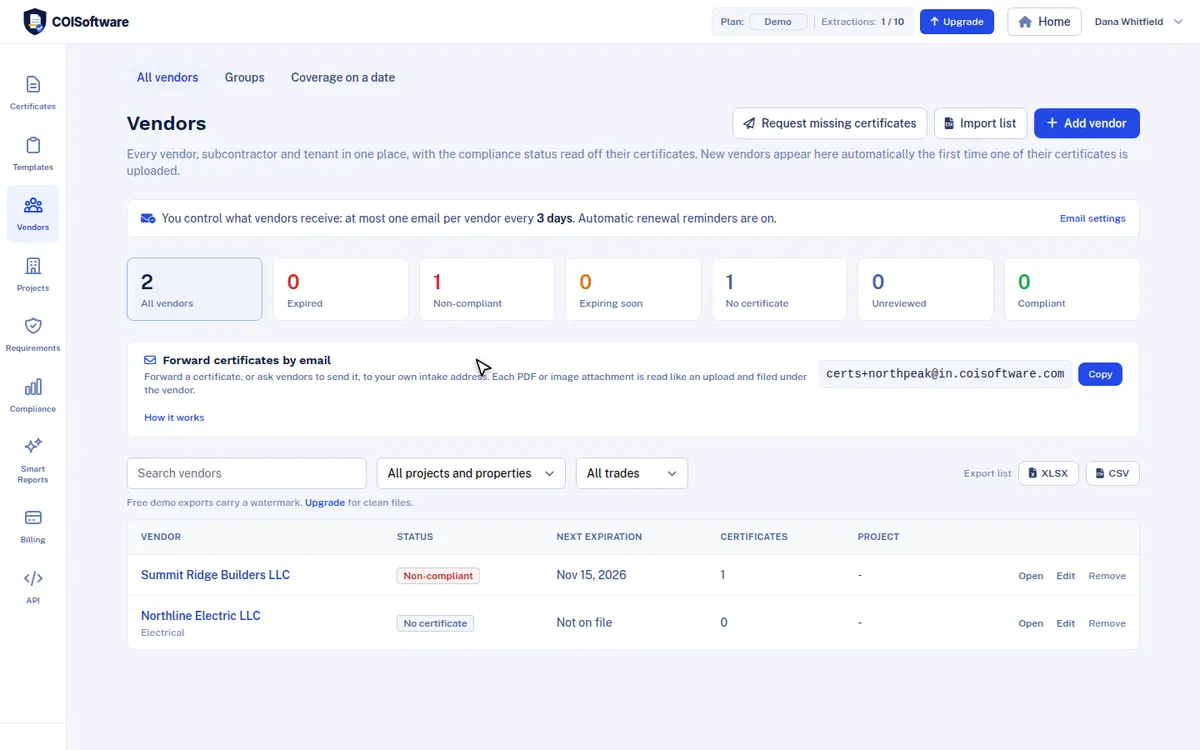
Forward certificates by email panel showing the account intake address and a Copy button

How to do it

  1. Open Vendors or Certificates and find the panel called Forward certificates by email.
  2. Click Copy next to the address.
  3. Forward a certificate to that address, or give it to your vendors and ask them to send theirs there.
  4. Each PDF or image attachment is read and appears under the vendor. Click How it works for the details.

Step 11

Projects and properties

Available in All plans

Group vendors by job, building, location or program, and give each group its own insurance requirements.
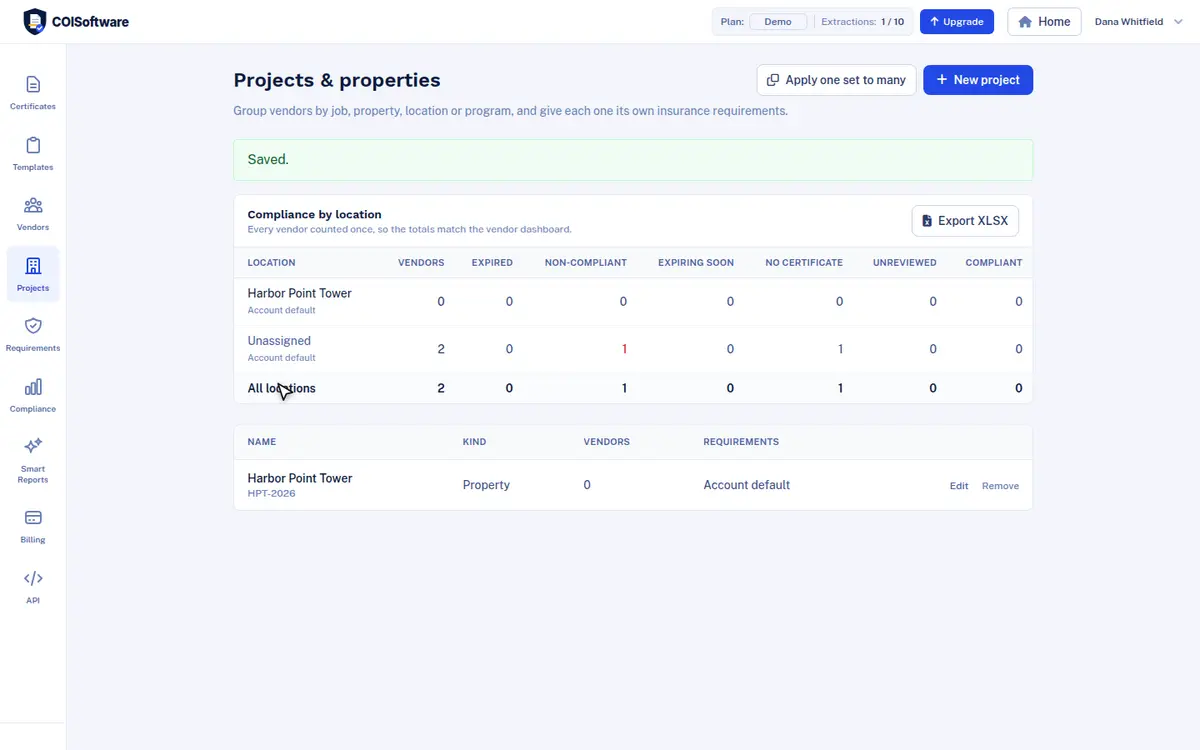
Projects and properties page with a saved project and the compliance by location table

How to do it

  1. Click Projects in the left menu, then New project.
  2. Enter the name, choose the kind (Project, Property, Location or Program) and add a reference such as an internal job or lease number.
  3. Optionally pick a requirement set for the project. The default is Use the account default.
  4. Click Save. The Compliance by location table shows, for every location, how many vendors are expired, non-compliant, expiring soon, without a certificate, unreviewed or compliant.
  5. Assign a vendor to a project when you add or edit it. Click Export XLSX to download the table.

Step 12

Groups and coverage on a date

Available in All plans

Two views for risk and audit questions. Groups shows where the gaps sit. Coverage on a date shows what was in force on any day.
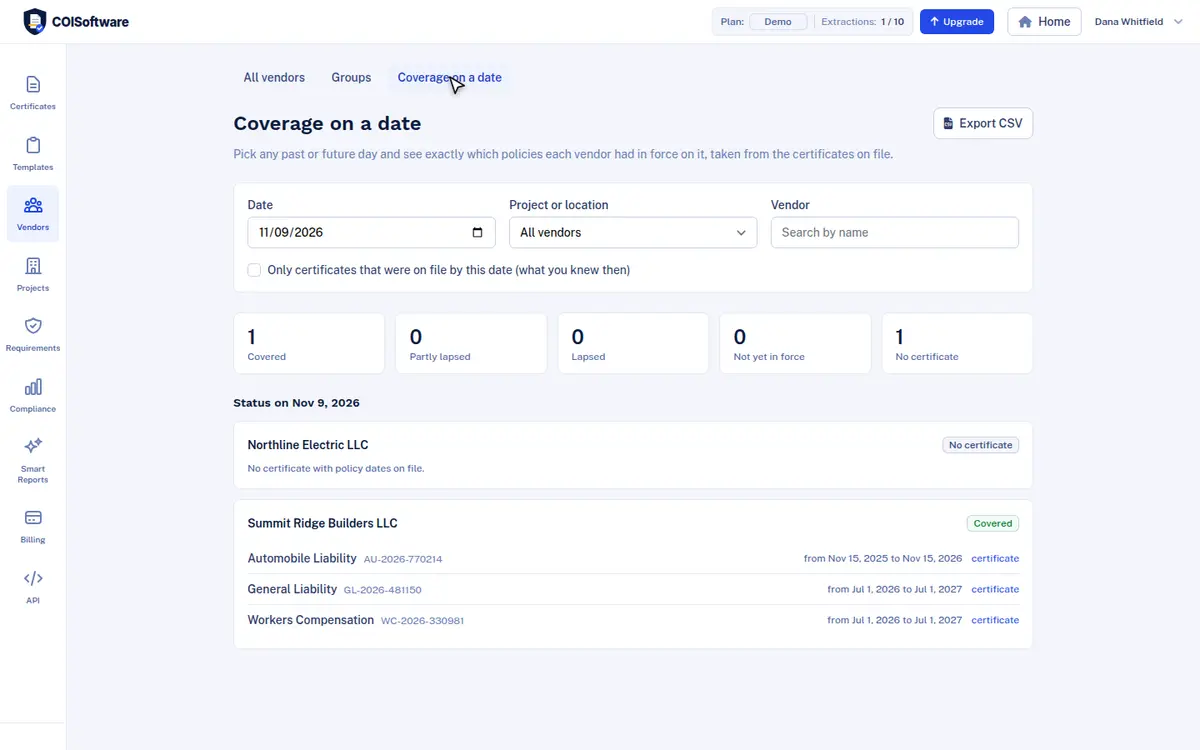
Coverage on a date page listing which policies each vendor had in force

How to do it

  1. Open Vendors, then the Groups tab.
  2. Pick Group by: Project or location, Vendor type or trade, Owner, Region or Risk tier.
  3. To label vendors in bulk, tick them, set Owner, Region or Risk tier under Set owner, region or risk tier, and click Apply.
  4. Open the Coverage on a date tab. Pick any past or future date and optionally a project and a vendor name.
  5. Read the cards (Covered, Partly lapsed, Lapsed, Not yet in force, No certificate) and the policies listed under each vendor. Tick Only certificates that were on file by this date to see what you knew then.

Step 13

Compliance overview

Available in All plans

The portfolio picture: how many certificates are active, expiring soon, expired or unknown, and how many are compliant, non-compliant or unreviewed.
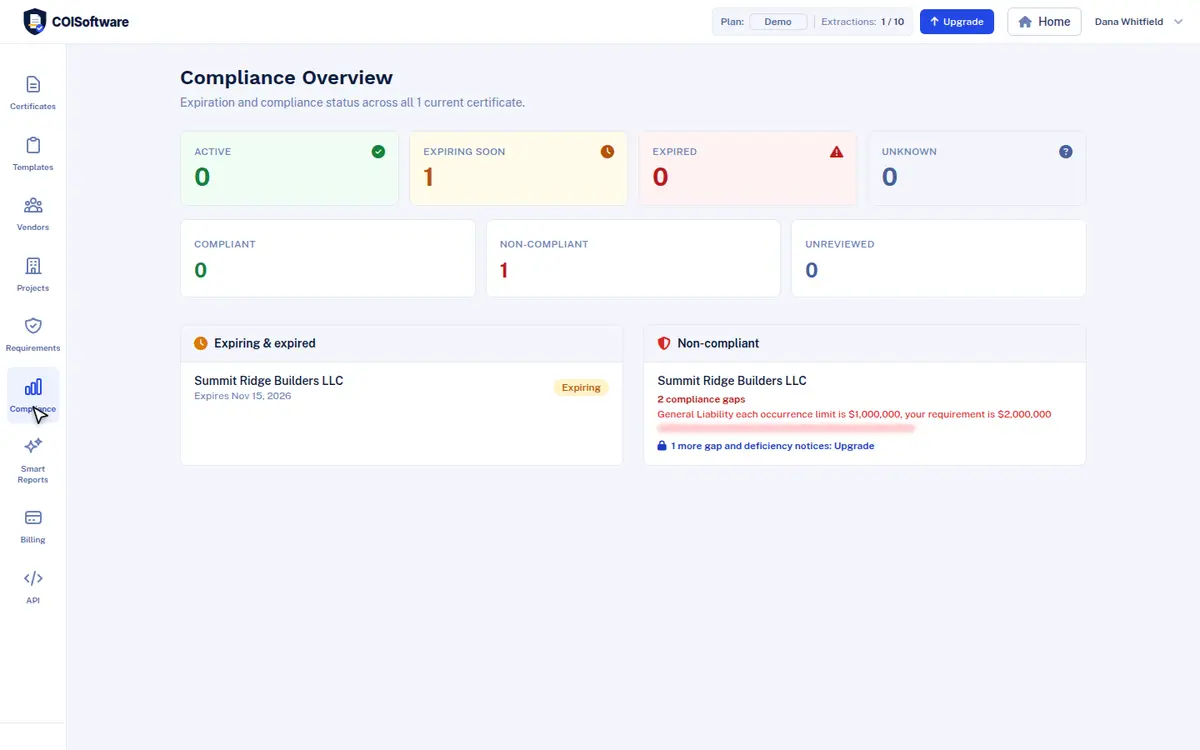
Compliance overview with active, expiring soon, expired and compliant counts

How to do it

  1. Click Compliance in the left menu.
  2. Read the counts at the top.
  3. Use the lists Expiring and expired and Non-compliant to see which vendors need attention.
  4. If a certificate is Unreviewed, click Set your requirements to get a verdict.

Step 14

Smart Reports

Available in Starter 5 a month, Plus 20 a month, Pro and Enterprise more (Enterprise 1,000 a month)

Smart Reports turns the certificates you have already read into a summary. It categorizes carriers, normalizes coverage names and summarizes what you hold.
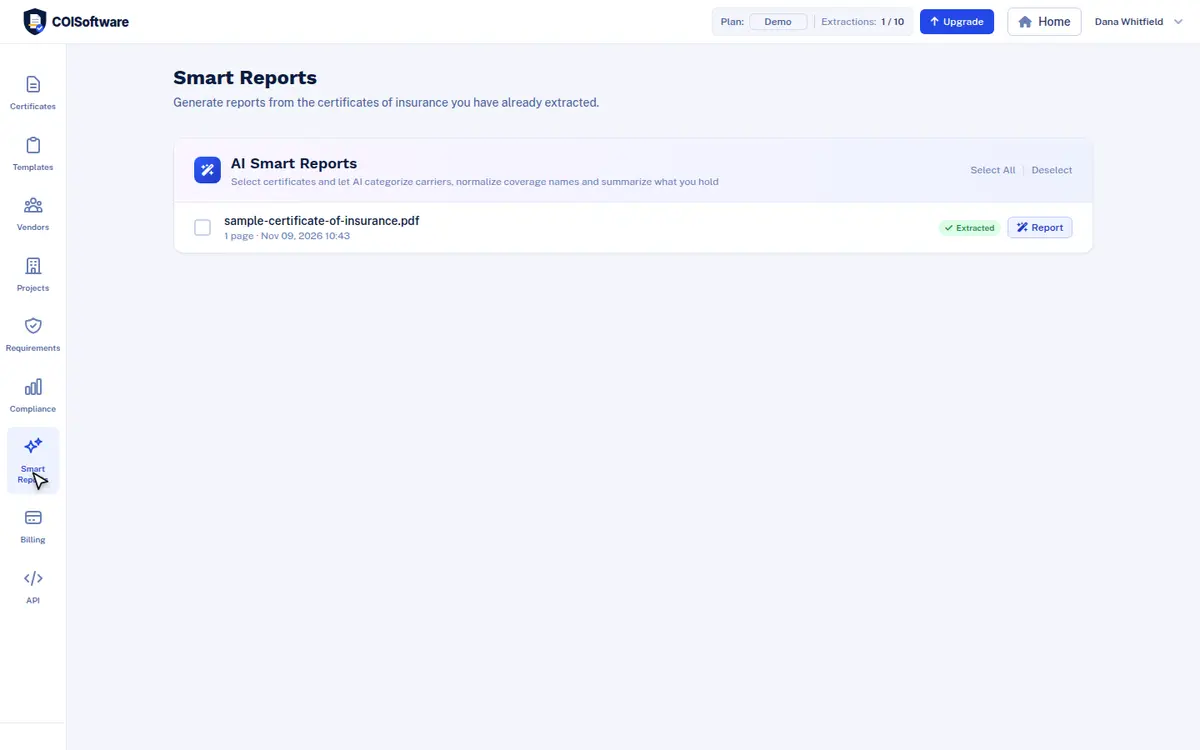
Smart Reports page listing extracted certificates that can be selected for a report

How to do it

  1. Click Smart Reports in the left menu.
  2. Select the certificates to include, or click Select All.
  3. Start the report for the selection and open it when it is ready.
  4. Each report counts against the monthly Smart Reports allowance of your plan.

Step 15

Extraction templates

Available in All plans

A template is the list of fields that are read from a document. Certificates use the Certificate of Insurance (Generic) template by default.
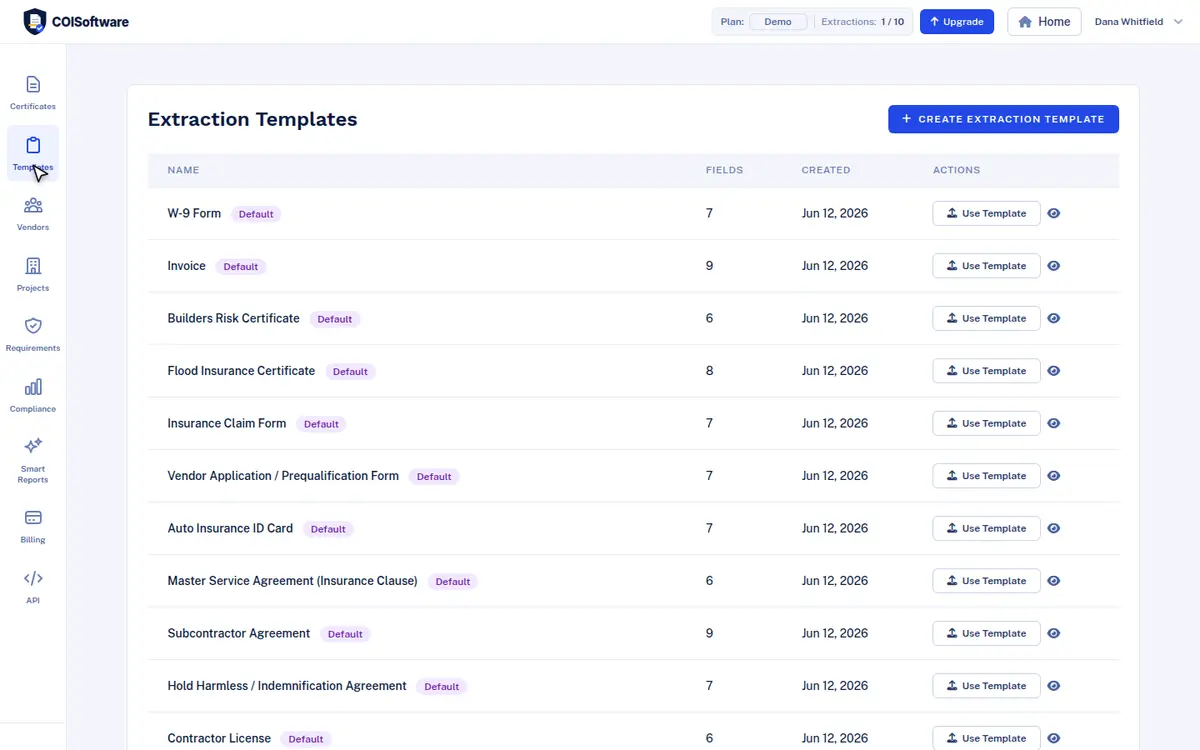
Extraction templates page with the list of templates and a create button

How to do it

  1. Click Templates in the left menu to see the templates in your account.
  2. Click Use Template on a template to upload a document with it.
  3. Click Create extraction template to choose your own fields, then use it from the Template list on the Certificates page.
  4. On a result page, pick another template and click Re-read with template to read the same file again.

Step 16

API

Available in Pro and Enterprise

The API lets your own software post a certificate and read the result as JSON.
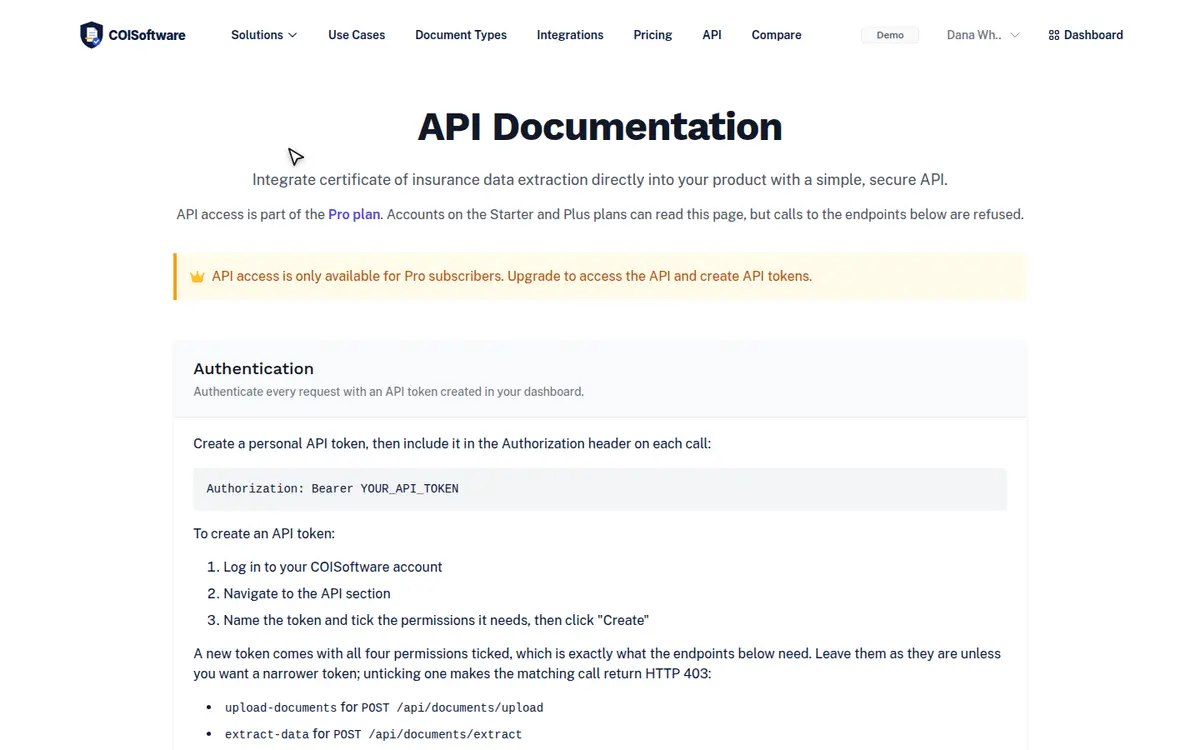
API documentation page with request examples

How to do it

  1. Click API in the left menu. On the Pro and Enterprise plans you can create a token there with Create API Token.
  2. Send the token as a bearer token with every request.
  3. Upload a file with POST /api/documents/upload, then start the reading with POST /api/documents/extract.
  4. Read the result with GET /api/documents/extraction/{hash}. List the available templates with GET /api/documents/types.
  5. The API documentation page has complete examples you can copy.

Good to know. On the Starter and Plus plans the same data is available through the Excel, CSV and JSON exports.

Step 17

Your profile

Available in All plans

Your name, email address and password.
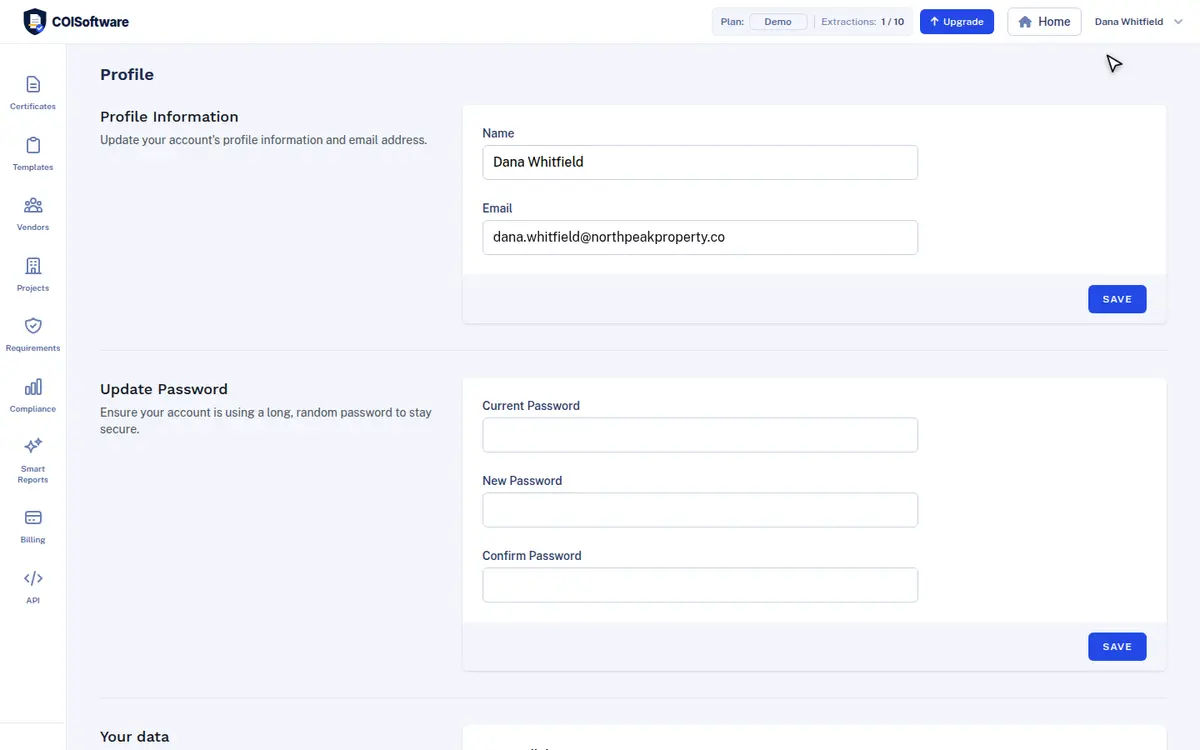
Profile page with name, email and password settings

How to do it

  1. Click your name at the top right.
  2. Choose Profile to change your name or email address, or to update your password.
  3. Choose Subscription for billing, or Log Out to leave the workspace.

Step 18

Billing and plans

Available in All plans

Billing shows your plan, your allowance, your invoices and your payment methods.
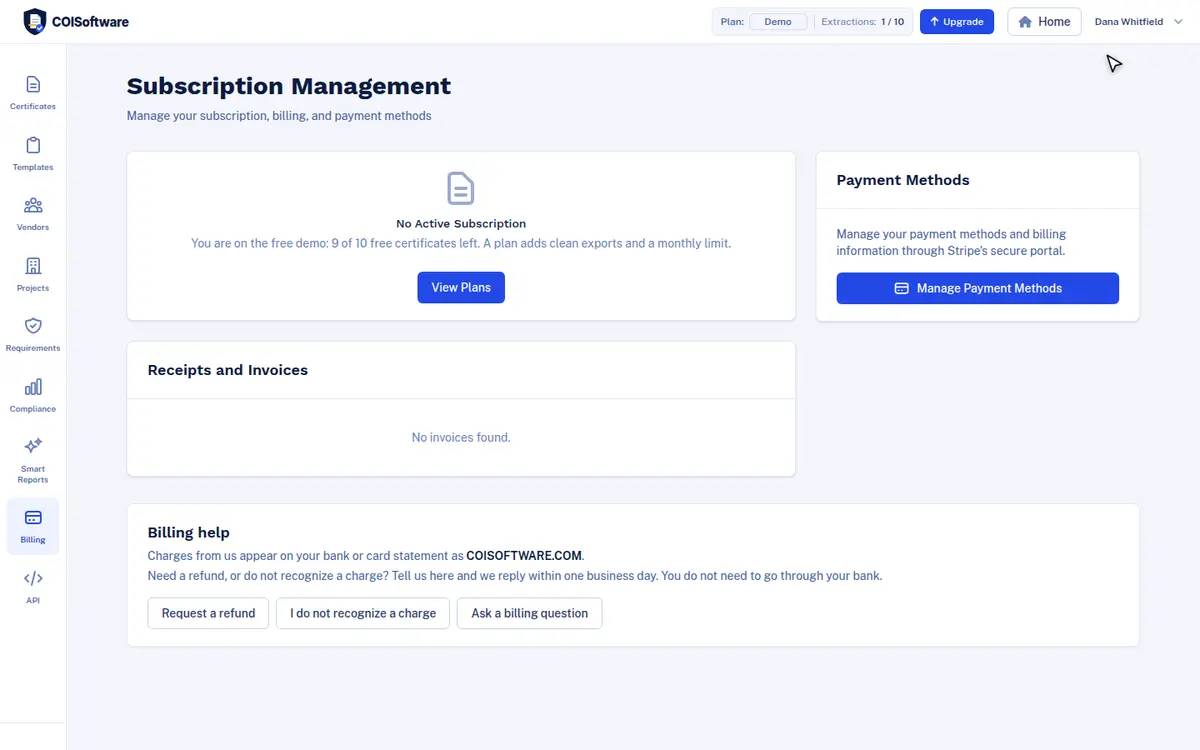
Subscription management page with plan status, invoices and payment methods

How to do it

  1. Click Billing in the left menu, or click Upgrade at the top of any page.
  2. Click View Plans to compare Starter, Plus, Pro and Enterprise. Switch between Monthly and Yearly. Yearly billing is half the monthly price.
  3. Choose a plan and pay by card in the secure checkout. When you upgrade, the new allowance applies right away.
  4. Come back to Billing to see Receipts and Invoices, to open Manage Payment Methods, or to cancel. A cancelled plan keeps working until the end of the period you paid for and does not renew.

Good to know. Charges appear on your statement as COISOFTWARE.COM.

Plans at a glance

Every plan includes the full workflow in this guide. Plans differ in monthly certificate allowance, Smart Reports and API access. Full prices are on the pricing page.

Starter

$49 a month, or $24 a month billed yearly

  • 2,500 Base AI or 500 Pro AI certificates a month, one shared allowance
  • Bulk upload of up to 50 files
  • Your own requirement rules
  • 5 Smart Reports a month
  • Excel and CSV export

Plus

$149 a month, or $74 a month billed yearly

  • Everything in Starter
  • 10,000 Base AI or 2,000 Pro AI certificates a month, one shared allowance
  • 20 Smart Reports a month

Pro

From $499 a month, or from $249 a month billed yearly

  • Everything in Plus
  • Separate monthly allowances for Base AI and Pro AI in three sizes
  • API access
  • More Smart Reports every month

Enterprise

$9,980 a month, or $4,990 a month billed yearly

  • Everything in Pro, including the API
  • 700,000 Base AI and 160,000 Pro AI certificates a month
  • 1,000 Smart Reports a month

Questions and answers

Do my vendors need an account?
No. Vendors upload their certificate through a link you send them, with no login and no fee.
What counts as one certificate?
One uploaded certificate counts as one, whatever its page count, including the endorsement pages attached to it.
Which files can I upload?
PDF, JPG, PNG, BMP, HEIC and TIFF, up to 50 files at a time. Scans and photos are read with visual OCR.
How many certificates can I try before I pay?
A new account gets a one time demo of 10 certificates. Demo exports carry a watermark and some details are locked until you upgrade.
Where do the renewal reminders go?
To the email address of your account, 60, 30 and 15 days before a policy expires.
A value was read wrongly. What do I do?
Open the vendor, click Check and correct fields next to the certificate and fix the value. The change is recorded in the audit trail.
How do I cancel?
Open Billing, then manage your subscription. The plan keeps working until the end of the period you already paid for, and it does not renew.
Is there an API?
Yes, on the Pro and Enterprise plans. You can post a certificate and read the result as JSON. Every plan can export to Excel and CSV.
Where can I get help?
Use the chat in the corner of the screen. Describe what you were doing and, if you can, attach a screenshot.

Start with your own certificate

Upload one certificate and see the status, the gaps and the expiration date in seconds.